Troubleshooting Strategy Step 1:
Electrical Symptoms and Causes
THIS PAGE:A Strategy Overview: Symptoms
Step 1 of 2: From Symptom to Cause
NEXT PAGE:
Step 2 of 2 if necessary: Locating the Fault
A Strategy Overview
I hope the Background page has given you a picture of the extent and complexity of the electrical system of your home. Now you can begin to see how to go about troubleshooting electrical problems systematically. I do not want to discourage intuition, but it is easy to make false assumptions about what is going on. Therefore, I will lay out here a fairly organized approach that has impressed itself on me over the years, thanks to trial and error. It makes home electrical diagnosis more fun, less frustration.
The gist of the diagnosis strategy is to put your symptoms in a category, then by experiments and logic to determine the type of cause, and finally, if necessary, to pinpoint the location of the cause by additional tests and logic. This last part (locating the cause) is addressed on the next page, Locating the Fault.
First, I recommend that you observe the problem yourself, if possible. Do not go blindly by what others have said or by the language they have used to describe the matter. Some troubles only happen once and are gone. Some things thought to be dead are actually working.
Next, consider what others say about the problem and its history. And ask them, and yourself relevant questions. Often the coinciding of the problem with another event is relevant. But often it is not. Take into account what anyone has already done to try to solve things. This will tell you whether layers of complication may have been added to the picture. You may become tempted to think the cause of the electrical problem is clear, and to short-cut a more deliberate approach such as I am giving you. If you do go after such a probable cause, take care not to affect the crime scene in a way that will complicate it for you later if you come up empty.
Then determine what category the problem's symptoms fall into. This will help decide what can be done to get to the cause. Briefly the basic symptom categories I suggest are:
- Some things don't work. This is the most common trouble. And when this is the rock-bottom symptom, it is important to recognize it as such. The symptom is not suddenly: "the breaker doesn't work" or "the fixture is bad" or "the switch doesn't work". Those may be possible causes, and therefore replacing such components might take care of the problem. But if you are going to be an effective detective, you need to keep the real mystery -- the basic symptom -- in mind. Namely, some things are not working. Then you can proceed to test out the various possibilities (and save time and money by not replacing everything in your electrical system).
- Things are working now but in the past some things have gone out and later come back on their own or else they will blink or flicker at times. In other words, the failure is intermittent. It is either very brief or longer lasting -- even for days. If there is blinking, it would be instantaneous (a fraction of a second) and might or might not be related to heavy appliances turning on or off. Any flickering would be irregular or jagged (not rhythmic) and might go on a while.
- Lately, things dim down or brighten up for a time, and sometimes in response to my turning other things on or off. This category is to be distinguished from the previous one. The brightness or dimness may continue for minutes. Then it might fluctuate without warning.
- Something won't turn off. This is a little different from "some things don't work" ("1" above), which refers to lights, outlets, or appliances not working. This category could mean a control device (switch) is not doing its job, but there could be another cause.
- Someone experienced a shock. This is actually quite uncommon, but it is the most impressive to a person -- impressive about its danger and the need to fix the problem.
Next, try to observe and note the scope of the problem, regardless of what the symptom-category is. For instance, which lights in the home flicker and which don't? Are there outlets that are dead besides the ones you use and miss the most? This is often very important. Perhaps you should write these facts about the problem down for use in the rest of the diagnostic process. The extent of the problem, along with the category of its symptoms, will help you see what experiments to make at what places.
Then narrow down the type of cause by means of various procedures or tests. I will describe these procedures below. Here I want to emphasize the frame of mind with which to approach the testing. Carefulness, patience, and confidence are important. Occasionally you will meet with success early in the game, but don't expect this. Again, writing down what you have done and the results you observed may be helpful. Keep noticing your assumptions. Don't introduce more than one variable at a time. To be reliable, electrical diagnosis needs to be somewhat scientific in its method.
Step 1 of 2: From Symptom to Cause
There are several possible causes for a given symptom. The basic symptom, chosen from 1 through 5 above, does eliminate some causes immediately, as can be seen in this chart:| S Y M P T O M | |||||
|---|---|---|---|---|---|
| CAUSE: | Does not work | Goes off and on at will or flickers | Runs dim or bright sometimes | Won't go off | Shocks |
| A. Short/Ground-or-arc-fault/Overload | Yes | -- | -- | -- | -- |
| B. Circuit (or main) wire connection poor ("open") | Yes | Yes partially | Yes | -- | -- |
| C. Ground-fault without an intact intended ground path | -- | -- | -- | -- | Yes |
| D. Miswiring | Yes | -- | -- | Yes | Yes |
| E. Bad or mis-set device | Yes | Yes | -- | Yes | -- |
Without knowing the kind of cause at work in your problem, you are unlikely to get to the root of it. For definitions of some of these causes, see the Glossary. How does a person go about identifying which one kind of cause is behind the symptom? To answer this, we need to get specific for each symptom, as follows.
1. Does Not Work. Is the cause some kind of short [A in the chart], an overload [also A], an open [B], a miswiring [D], or a bad device [E]?
- A bad or turned-off device itself [E] (other than a bad circuit breaker) will not affect more lights or appliances than the device is supposed to control or serve. But there can be connections at that switch, receptacle or light that could be poor and affect the circuit from that point on.
- A miswiring [D] should almost be assumed if the problem's timing corresponds with some home remodeling or some Upgrading of devices that has gone on. By miswiring I mean WRONGLY connected, not poorly connected. When there is a miswiring, it can sometimes be the ultimate cause behind other causes listed in the chart above.
- When some things aren't working, the most important cause to determine or eliminate is the one I lump under the title "Short/ground-or-arc-fault/overload" [A]. I say this because these all result in a tripped breaker (blown fuse) or tripped GFI. If such trippedness is not discovered early, the cause behind the outage will escape you. In fact, finding and attempting to reset these can quickly lead to knowing which of these three subcauses is operating. Namely, a breaker or GFI that lets itself be reset indicates that there had been an overload or a non-recurring ground-or-arc-fault. (One exception about the breaker that allows resetting is if the breaker sometimes gets hot during normal loads because of poor connections at or in it; this will make it false-trip at times.)... On the other hand, if a resetting results quickly in a retripping, then you have a short or an active ground-or-arc-fault. BECAUSE THE TRIPPEDNESS OF A DEVICE IS SO CRUCIAL TO KNOW, I WANT TO INSIST YOU GO TO Trip? to make certain you can confirm or eliminate the matter of tripping, because these devices are often hard to locate, reset, or interpret.
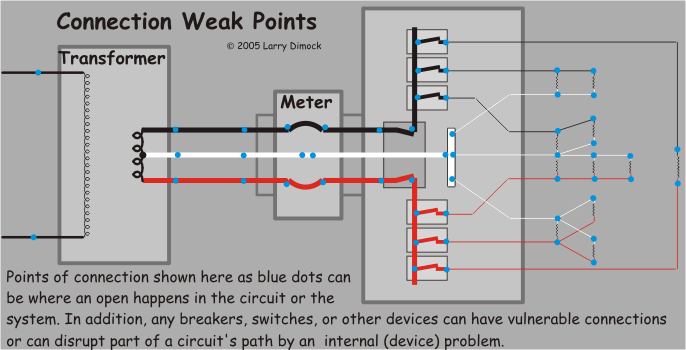
- An open [B -definition] is most likely the cause of an outage if the other causes (in the bullet-points above) have been ruled out. But independently, an open neutral is almost certain if hotness is still present at a non-working item; a receptacle tester would read "open neutral" or "hot and ground reversed". An open is also likely if the dead items number more than one, but not enough to constitute a whole circuit. Dead outlets in the Places required to have GFCI protection, should not be thought to have an open till a tripped GFI is ruled out. For diagrams of opens, see How things go wrong.
2. Goes Off and On At Will or Blinks or Flickers. Is this symptom due to a partial open [B] in the wiring connections, or something wrong with a device [E] or fixture? If the extent of the blink or outage is limited to one item or one switch's set of lights, then the cause is probably a bad device or fixture. If the things affected are more widespread, then the cause will be a connection that is compromised -- partially open -- somewhere. Its location would be one of the Connection points along the circuit, at its breaker, or at a main wire. A main wire problem would affect things on more than one circuit.
3. Runs Dim or Bright Sometimes. This symptom has only one type of cause: an open [B]. It may be intermittent or not. Is a main wire (of power company, meter area, or within the panel) having trouble, or is it a circuit wire? If these strange voltages affect things in many parts of the home, a Main wire connection is probably poor -- often the power company's fault (call them). If it is limited to one or two circuits, then it is probably an Open neutral shared by two circuits.
4. Won't Go Off. Is this from a bad device [E] or a miswiring [D]? Miswiring from remodeling or from Upgrading of devices should occur to someone right away as a likely cause. Whatever won't go off will be noticed quickly and associated with such recent activity. Aside from miswirings, the cause will be that the device that is supposed to shut the thing off is either not adjusted right, or else is faulty and will need replacement. Repair may be iffy.
5. Shocks Someone. Aside from the rare 240-volt shock, this would by nature be a case of a ground-fault finding its only path to ground [C] through a person's body. Miswiring [D] is a prior cause that might set up this condition; rewiring or replacement of devices in a home may be fresh in your mind and suggest good places to look.
Now What? Of the causes we have just gone over, the location of some will be clear immediately from the chart. This is true of the bad device, the overload, and some miswirings. (Other miswirings may need to be pursued in the manner of a short or open [next page].) So you may be ready to make a repair or replacement. The overload is a usage problem. You will understand an overload if you learn the extent and capacity of the circuit and compare that to the total wattage of the lights and especially appliances that were running on it. (1800 watts and 2400 watts, respectively, can run on a 15-amp and a 20-amp 120-volt circuit.) But the other causes will need further investigation to find the exact place on the circuit that is responsible. These are: the Short, the Ground- (or arc-) fault, the Ground-fault with no ground (=shock), and the Open. Locating these is the next step in home electrical troubleshooting, which is the business of the next page, Step 2 of 2 if necessary: Locating the Fault.
"Every other web site I visited was rich on multiple steps to replace a
receptacle, but completely lacking actual descriptive, logical diagnostics."
-Bill, VA